


When you finish entering your course content into Web Course Builder, you build the course (convert it into a web site) by clicking Generate Course  on the toolbar (or choosing Publish > Generate from the menu bar).
on the toolbar (or choosing Publish > Generate from the menu bar).
 By default, the web version of the course is saved in a directory in your ReadyGo installation directory. The default directory is courses/your_course_name/.
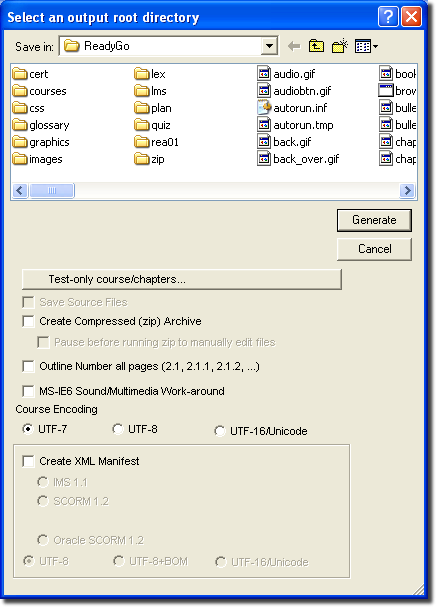
- You can generate a course that contains test and survey pages only. You select either all chapters or selected chapters that will display included tests only. If this button is highlighted, at least one of your courses is set up for tests only.
- When you generate a course, you can choose to create a compressed archive file (zip) of the generated course. You also have the option to pause before the zip archive is created to manipulate your generated course files.
- You can choose to automatically number your course chapters and bullet pages in an outline numbering style. For example, the bullet pages in chapter 1 are labeled 1.1, 1.2, and so on.
- You have the option of UTF-7 (7-bit: standard English and most European languages), UTF-8 (Multi-byte character set - accepts most languages), or UTF-16 (Double-byte: covers all languages) unicode for your course.
US & Europe customers can use the 7-bit. For true internationalization (e.g. multiple languages in a single course or Japanese, Tamil, Vietnamese, Chinese, etc.) on Win2K and later, customers can use UTF-16.
- If your course uses SCORM for tracking, you will need to create an XML packaging manifest file that describes all the resources needed to transfer a course to a LMS, and identifies the titles and URLs of the component lessons for the course syllabus.
You can create an XML manifest file that complies with the Instructional Management Systems Global Learning Consortium (IMS) specifications or an IMS packaging manifest with SCORM- or Oracle-specific extensions.
Note:You must specify the appropriate tracking you are using. See the Tracking chapter for more information.
- The first time you generate a course, it is important to generate it to a new directory so that it does not overwrite files from another course.
- After you generate a course, you are asked if you want to view it in a browser. The new course is displayed in a web browser on your desktop.
- At any time, you can return to Web Course Builder to update and modify the course.
- After you make changes to a course in Web Course Builder, save the course and generate the course again.
 Tip Don't know where the course is saved? Look on your hard drive in ...\readygo\courses\your_course_name\index.htm.
You can also look at the web browser's address field to find the location of your course. |


